
Airport windsocks, or wind cones, act as reliable visual indicators, offering real-time feedback on both wind direction and approximate wind speed. Pilots rely on such information to make critical decisions during various phases of flight, including takeoff and landing, especially in the absence of Air Traffic Control (ATC) or Common Traffic Advisory Frequency (CTAF).
The Federal Aviation Administration (FAA) has established regulations governing the design, installation, and maintenance of airport windsocks, ensuring uniformity, reliability, and consistency across all airport facilities. Compliance with these regulations helps minimize the risk of confusion or misinterpretation of wind conditions, thereby reducing the likelihood of airport accidents.
Let’s explore the FAA standards and guidelines for airport windsocks, covering everything from design specifications to installation requirements and maintenance protocols.
- Key FAA Regulations
- Installation Requirements
- Maintenance Responsibilities
- Top-Quality Airport Windsocks for 100-Percent Reliability
Key FAA Regulations
Here’s a breakdown of the FAA specifications for various aspects of airport windsocks to ensure functionality and reliability:
Fabrication
FAA-approved windsocks must take the shape of a truncated cone when filled with air. The windsock must completely extend when experiencing wind speeds of 15 knots (28 km/hr or 17 mph), ensuring accurate wind indication.
Dimensions
There are two standard sizes for airport windsocks:
-
-
-
- Size 1 – minimum length of 8 ft (2.5 m) with an 18-in (0.45 m) diameter throat opening
- Size 2 – minimum length of 12 ft (3.75 m) with a 36-in (0.9 m) diameter throat opening
-
-
Fabric
Fabric must be durable, colorfast, and water-repellent to withstand various weather conditions. The FAA recommends cotton, synthetic material, or a combination of both. Manufacturers are required to certify that the fabric meets specific strength and colorfastness standards.
Color
Acceptable colors are natural (white), yellow, or orange. No lettering or logos are permitted on the windsock fabric to maintain clarity and visibility.
Framework
The framework must securely hold the fabric portion of the windsock straight for at least three-eighths of the length. Both metallic and non-metallic materials are permitted. If ferrous materials are used, corrosion protection is mandatory.
Installation Requirements
There are two types of windsocks used in airports, each requiring specific supporting structures:
-
- L-806. These windsocks are mounted on low-mass supporting structures designed for easy installation and maintenance. The support must withstand a moment of 350 pound-feet (475 Nm) without damage while failing safely before reaching 700 a moment of pound-feet (950 Nm) to minimize the risk of damage to an aircraft in the event of an accidental collision.
- L-807. The L-807 windsock is mounted on rigid supporting structures, which can be hinged at the base or near the middle for ground-level maintenance. These supports must withstand a moment of not less than 3200 pound-feet (4340 Nm) without damage, ensuring durability and stability in various environmental conditions.
In addition, airport windsocks can be either lighted or unlighted. Here are the lighting requirements for each style:
-
- Style I-A: Externally Lighted. The setup uses external light fixtures directed at the windsock. These fixtures must be strategically positioned to minimize glare for pilots. The FAA requires a minimum illumination of 2 ft-candles (fc) on any point of the horizontal plane described by the complete rotation of the windsock.
- Style I-B: Internally Lighted Windsocks. The windsock itself contains internal lights. The FAA mandates backup or redundant light sources to maintain visibility even if one of the primary lights fails. The fabric windsock should maintain an average luminance of 10 to 30 ft-lamberts (fL) with a minimum luminance of 2 fL.
- Style II: Unlighted. These windsocks are not equipped with any lighting, making them suitable mainly for daytime operations.
How to Install Airport Windsock
To ensure accurate readings of wind direction information, airport windsocks must be installed properly. Here’s a step-by-step guide on how to install an airport windsock:
-
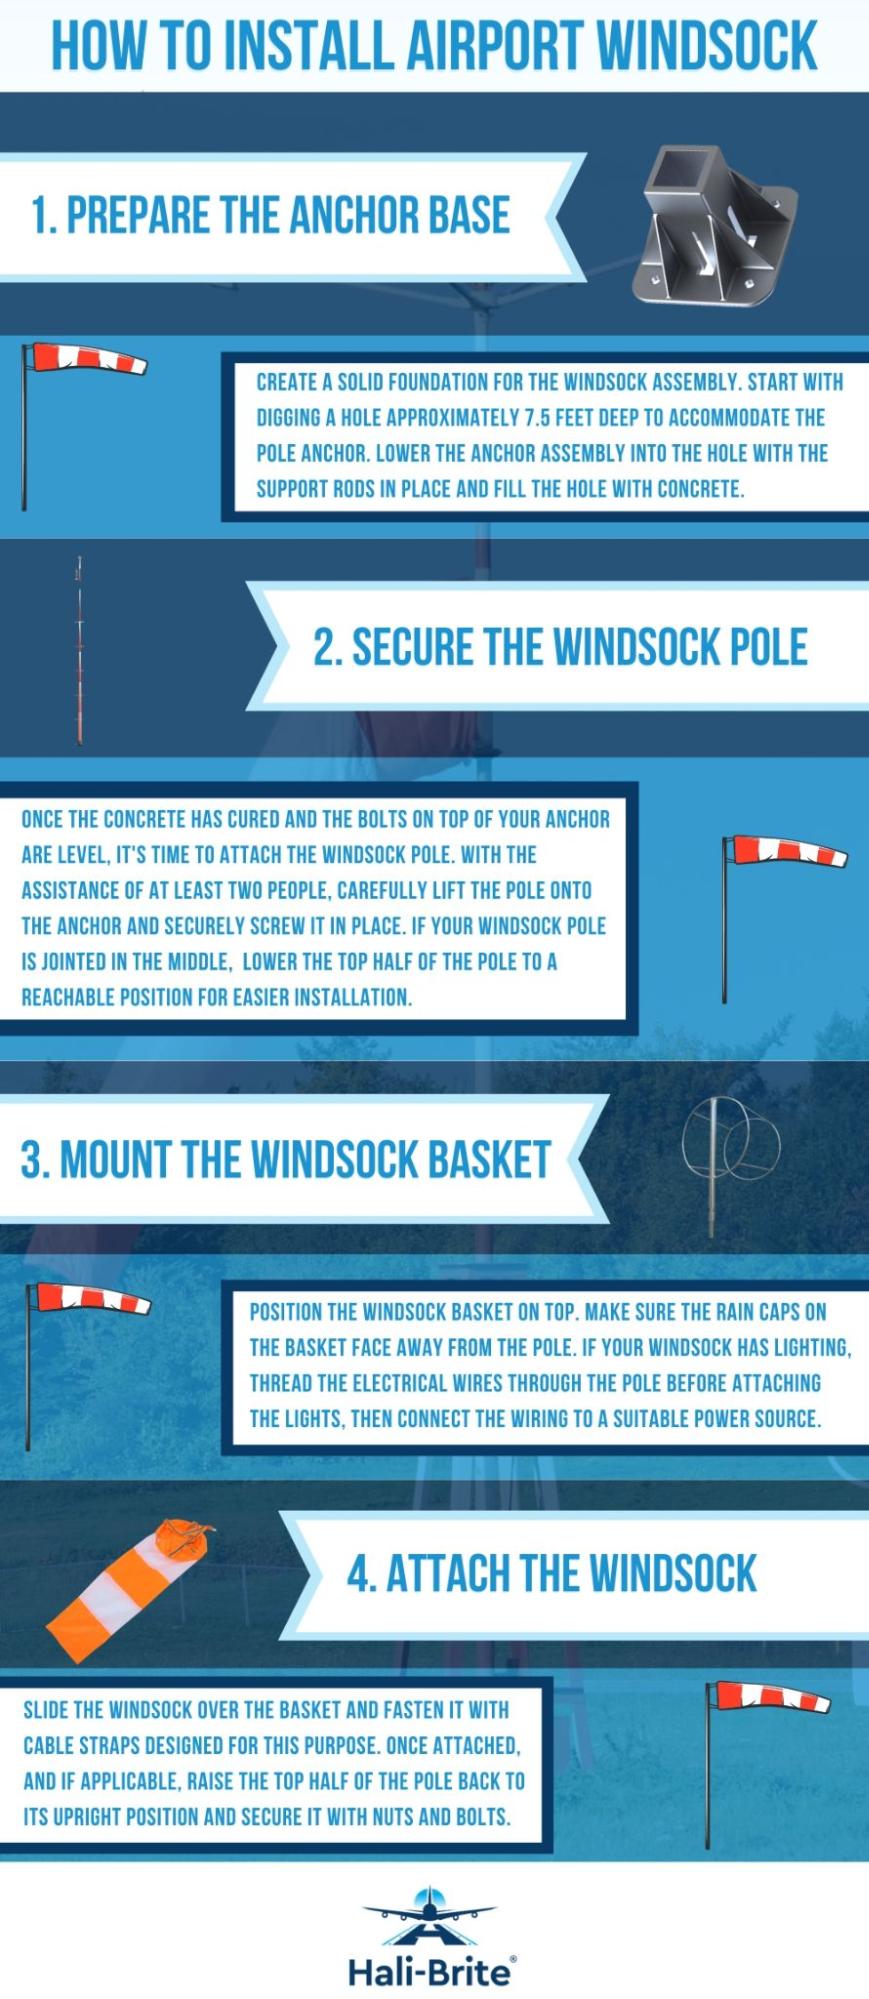
- Prepare the Anchor Base. Create a solid foundation for the windsock assembly. Start with digging a hole approximately 7.5 feet deep to accommodate the pole anchor. Lower the anchor assembly into the hole with the support rods in place and fill the hole with concrete.
- Secure the Windsock Pole. Once the concrete has cured and the bolts on top of your anchor are level, it’s time to attach the windsock pole. With the assistance of at least two people, carefully lift the pole onto the anchor and securely screw it in place. If your windsock pole is jointed in the middle, such as our Beacon Basket Pole, lower the top half of the pole to a reachable position for easier installation.
- Mount the Windsock Basket. Position the windsock basket on top. Make sure the rain caps on the basket face away from the pole. If your windsock has lighting, thread the electrical wires through the pole before attaching the lights, then connect the wiring to a suitable power source.
- Attach the Windsock. Slide the windsock over the basket and fasten it with cable straps designed for this purpose. Once attached, and if applicable, raise the top half of the pole back to its upright position and secure it with nuts and bolts.
Maintenance Responsibilities
Airport windsocks are typically exposed to the elements 24/7. Neglecting the upkeep of these wind direction indicators can jeopardize aviation safety. That’s why, to make sure your windsocks are always providing accurate, reliable information to pilots, regular inspections and maintenance are absolutely essential.
During these inspections, be sure to check for:
-
- Fabric Condition. Thoroughly inspect the fabric for tears, fading, or any signs of deterioration. These issues can compromise the windsock’s visibility and its ability to indicate wind direction accurately.
- Swivel Mechanism. Ensure the swivel mechanism, which allows the windsock to rotate 360 degrees freely with changes in wind direction, is functioning correctly. Any stiffness or resistance can indicate the need for lubrication or repair.
- Support Structure. Examine the support structure – the pole, anchor, and any hinges or joints. Look for any signs of corrosion, bending, or potential weak points that can lead to failure.
- Lighting Functionality. If your windsock has internal or external lighting, verify that all the lights are working correctly. Check for any burnt-out bulbs, wiring issues, or other electrical problems that can affect visibility during nighttime operations.
It’s important to keep detailed maintenance logs of any windsock inspections, repairs, and replacements performed. These logs not only demonstrate compliance with FAA regulations but also provide a valuable history to track the condition of your windsocks and support structures over time and identify any recurring issues that might require attention.
Top-Quality Airport Windsocks for 100-Percent Reliability
When it comes to ensuring safe and efficient airport operations, every detail counts, especially the visual indicators that guide pilots. If you’re looking for FAA-certified airport windsocks designed to meet the highest performance and durability standards, Hali-Brite has you covered.
Our extensive range includes both lighted and unlighted windsocks, ensuring visibility and clarity in all lighting conditions. What’s more, we even offer solar-powered options, providing an eco-friendly and cost-effective solution for your airport’s wind direction needs. Contact us at (218) 454-095 or here today to learn more about our products.